Okay, so let’s talk pork chops. I know, I know, you’ve probably ended up with dry, tough hockey pucks more times than you care to admit. It’s a struggle many of us home cooks face! But trust me, achieving those perfectly tender and juicy pork chops with amazing flavor is totally doable. When I first started cooking, they were one of my biggest nightmares. Then, someone showed me a few simple tricks, like getting the pan screaming hot and letting the meat rest properly, and bam! It was a game-changer. We’re talking top-notch pork chops recipes, tender and juicy, every single time, with this straightforward skillet and oven method. It’s about understanding a few key techniques, and you’ll be a pork chop pro in no time.
Why These Top Notch Pork Chops Recipes Tender And Juicy Stand Out
What makes this recipe the one you’ll keep coming back to? It really boils down to a few golden rules that promise fantastic results, even on a busy weeknight. Forget about dry, sad pork chops forever!
- Foolproof Technique: We’re using a simple skillet-to-oven method that guides you perfectly. It’s all about building that beautiful golden crust and then letting the oven do the work to keep the inside wonderfully moist.
- Incredible Flavor: A little bit of seasoning, some fresh thyme, and that amazing pan sauce? Pure magic. The natural flavor of the pork shines through, enhanced by those simple additions.
- Weeknight Warrior: Seriously, you can have these amazing pork chops on the table in under an hour, including prep and cooking. It’s the perfect solution for a satisfying dinner without fuss.
It’s these combined elements that make these top-notch pork chops recipes truly tender and juicy, and I just know you’re going to love them.

Essential Ingredients for Tender and Juicy Pork Chops
Alright, let’s get down to what you’ll need to make these incredibly tender and juicy pork chops. The beauty of this recipe is that it doesn’t call for anything super fancy, just good quality basics handled the right way.
For the Pork Chops:
- 4 Pork Chops: I like to grab ones that are about 1-inch thick and weigh around 6 to 7 ounces each. This thickness is key for getting that nice sear without overcooking the inside.
- Salt and freshly ground black pepper: You know the drill, season generously all over! This is super important for flavor.
- 1 tablespoon Avocado oil or other high-heat cooking oil: We need an oil that can handle the heat without smoking like crazy. Avocado oil is my go-to, but a good canola or grapeseed oil works fine too.
- 2 teaspoons Fresh thyme leaves, chopped: Fresh herbs make all the difference, and thyme is just wonderful with pork.
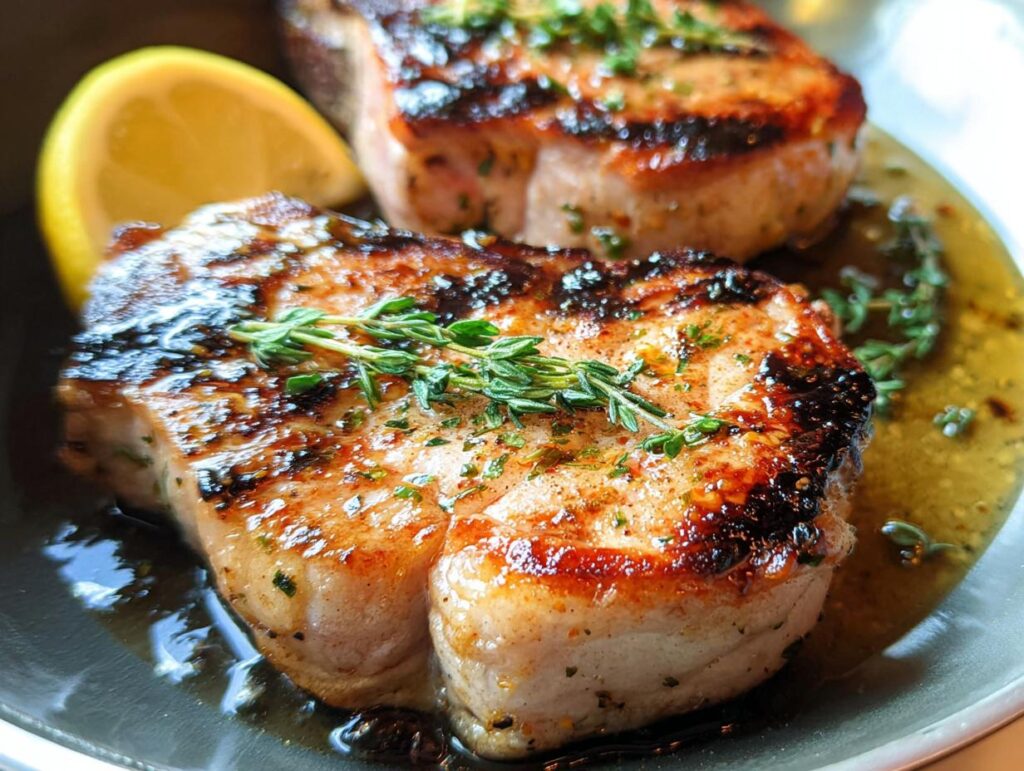
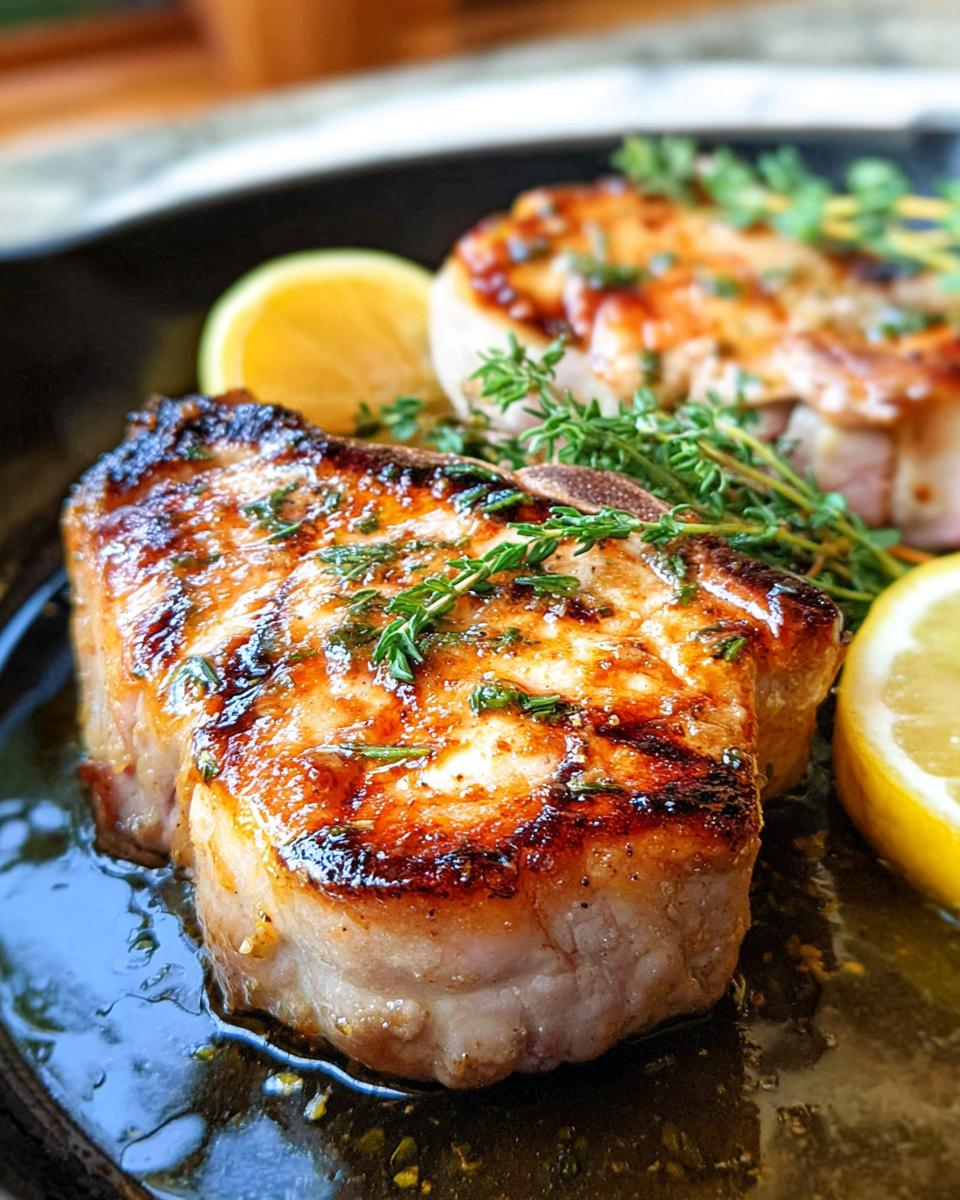
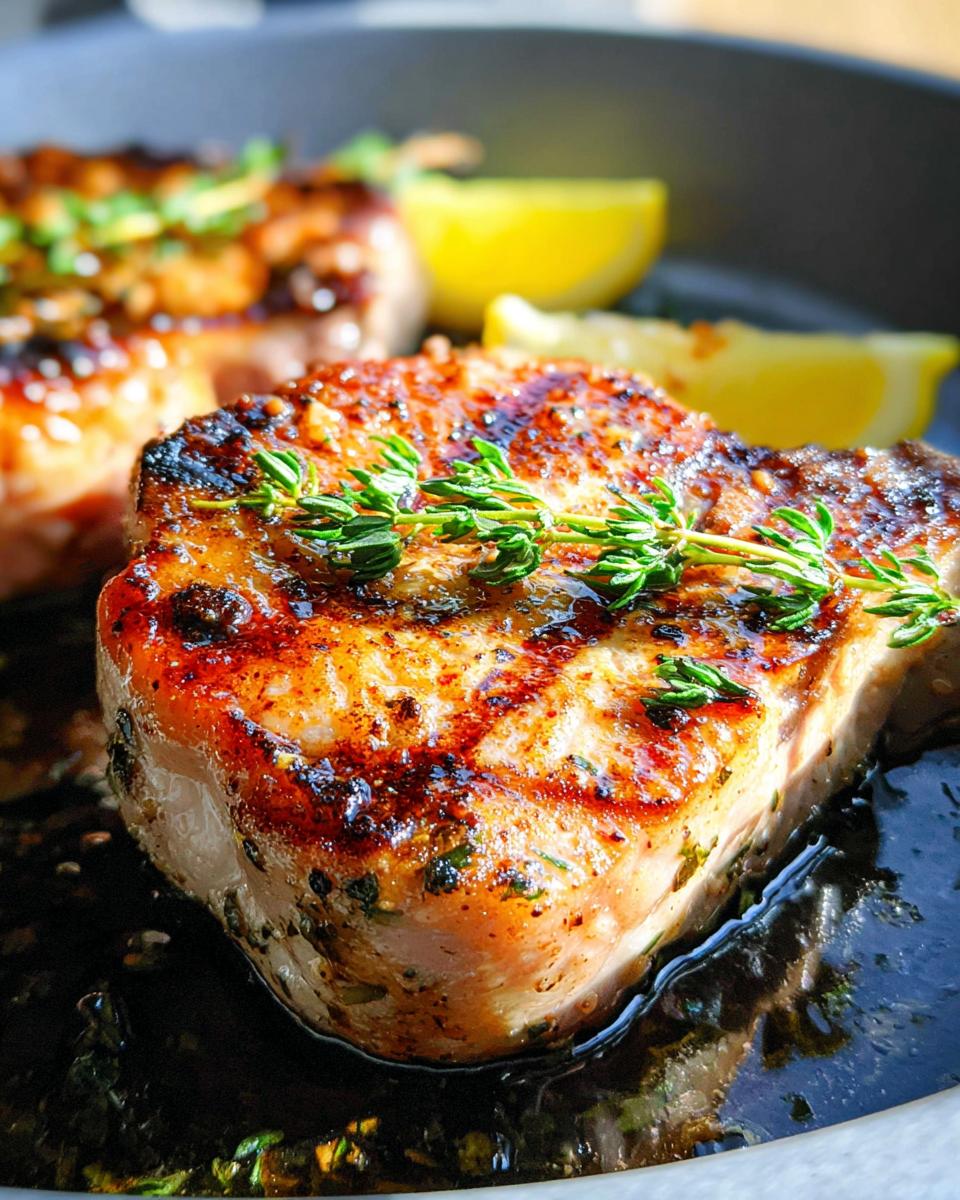
- 1 Lemon, cut into wedges: These little guys add a bright pop of flavor, especially when we roast them alongside the chops.
- Handful of fresh herbs (like parsley or dill, chopped): This is for garnish, but it really brightens up the final dish!
Optional Pan Sauce:
- 1 cup Chicken stock: This will be our base for a quick, flavorful sauce.
- 2 teaspoons Brown sugar, maple syrup, or honey: Just a touch of sweetness to balance things out.
- 1 tablespoon Butter: This is the secret to making the sauce silky and rich at the end.
See? Nothing too crazy. Just good stuff that’s going to make your pork chops sing!
Mastering the Skillet Method: Step-by-Step Instructions
Okay, this is where the magic really happens! Using the skillet and then popping it into the oven is the secret weapon for these top-notch pork chops recipes that are tender and juicy. It sounds fancy, but it’s honestly super simple and totally foolproof. Trust me, follow these steps, and you’ll be amazed at your own cooking. You might even find it as rewarding as making a perfectly cooked meatloaf, thanks to these detailed techniques. It’s a game-changer for achieving that amazing steak-house quality right at home.
Preparing the Pork Chops for Perfection
First things first, let’s get those pork chops ready. Take them out of the fridge about 30 minutes before you plan to cook. This is super important because meat cooks more evenly when it’s not ice-cold! While they’re hanging out on the counter, give them a good, generous sprinkle of salt and freshly ground black pepper. Don’t be shy! Seasoning both sides really helps build that yummy flavor right into the meat from the start.
Achieving the Perfect Sear
Now, let’s get that skillet smoking hot! Place your oven-safe skillet over medium heat for a good 2 to 3 minutes. You want it nice and hot. While it’s heating, gently pat your pork chops dry with a paper towel. This is another crucial step – a dry surface means a better sear! Once the skillet is hot, add your avocado or high-heat oil. Carefully lay the pork chops in the pan. If they have a nice fatty edge, hold them on that edge for about 30 seconds until it’s nicely browned. Then, let them sear, undisturbed, until they have a beautiful golden-brown crust, about 2 to 3 minutes. Flip them over, scatter that lovely fresh thyme on top, and sear the other side until golden brown, about another 2 to 3 minutes. That crust is pure yum!
Oven Finishing for Juiciness
We’re almost there! Arrange those lemon wedges around the pork chops in the skillet. Now, loosely tent the whole thing with foil or parchment paper. Instead of a super tight seal, we want just a little bit of steam to escape. Carefully transfer the skillet into your preheated 375°F (190°C) oven. If you don’t have an oven-safe skillet, no worries! Just move the seared chops (and lemons!) to a baking dish. Bake for about 8 to 15 minutes. The key here is an instant-read thermometer. You’re looking for an internal temperature of at least 145°F (63°C) in the thickest part of the chop. Start checking around the 8-minute mark and every couple of minutes after that. It’s better to check often than to overcook!

Crafting the Optional Pan Sauce
While your pork chops are resting for that essential 5 minutes (don’t skip this – it keeps them juicy!), let’s whip up a quick pan sauce. Place your skillet back over medium-high heat. Pour in the chicken stock and add your sweetener (brown sugar, maple syrup, or honey). Use a wooden spoon to scrape up all those delicious browned bits stuck to the bottom of the pan – that’s where all the flavor is! Let this simmer until it reduces by about half, thickening up nicely. Taste it and adjust seasoning if needed. Then, take the skillet off the heat and swirl in that tablespoon of butter. It makes the sauce super glossy and rich. So good!
Tips for Top Notch Pork Chops Recipes Tender And Juicy
Alright, let’s chat about making sure these top-notch pork chops recipes, tender and juicy, turn out perfect *every single time*. It’s all about a few little secrets I’ve picked up over the years. These aren’t complicated, but they make a huge difference!
First off, always, always use a thermometer. Seriously, it’s your best friend for cooking any kind of meat, especially pork chops. We’re aiming for an internal temp of 145°F (63°C), and that thermometer takes the guesswork out completely. No more dry chops!
Also, don’t overcrowd the pan when you’re searing. If you cram too many chops in there, they’ll steam instead of getting that beautiful, flavorful crust. Work in batches if you have to! And remember that five-minute rest after cooking? It’s non-negotiable. It gives the juices a chance to redistribute throughout the meat, making every bite super tender and moist. Think of it like letting a good stuffing settle before serving – it just makes things better!
Finally, choosing the right cut matters. Thicker chops, at least an inch, are way more forgiving and less likely to dry out. Boneless or bone-in both work here, but bone-in can sometimes add a little extra flavor.
Ingredient Spotlight: Understanding Your Pork Chops
So, what kind of pork chops are we talking about here? For the juiciest, most tender results, I really love using chops that are about 1-inch thick. This thickness gives you a bit of a buffer, making it way harder to overcook them. Whether you go for bone-in or boneless is totally up to you! Bone-in can sometimes add a little extra flavor as it cooks, but boneless works like a charm too. When you’re at the store, just look for good marbling – those little streaks of fat within the meat. That’s where the flavor and moisture come from, ensuring your chops aren’t dry!
Serving Suggestions for Your Pork Chops
Now that you’ve got these amazing, tender, and juicy pork chops, what should you serve them with? The possibilities are endless, but I love keeping things fresh and vibrant, especially alongside that savory pan sauce. Think about some roasted root vegetables like carrots or potatoes – they get so sweet and delicious in the oven. A simple green salad is always a winner too; something light and crisp, maybe with a tangy vinaigrette. Honestly, anything that complements that rich pork flavor works, but I’m particularly fond of a nice Thanksgiving-style salad for a touch of brightness!
Frequently Asked Questions about Tender and Juicy Pork Chops
Got a few lingering questions? That’s totally normal when you’re diving into a new recipe! Here are some things people often ask about making sure their pork chops are just right.
How do I make sure my pork chops aren’t dry?
The biggest key is not overcooking them! Using an instant-read thermometer and pulling the chops out when they hit 145°F (63°C) is essential. Also, letting them rest for at least 5 minutes after cooking allows the juices to redistribute, keeping them moist. Thicker chops (1-inch or more) are also more forgiving than thin ones.
Can I really use any pork chop? Bone-in or boneless?
Yep, this skillet method works great for both bone-in and boneless pork chops! Bone-in can sometimes add a little extra flavor and moisture, but either will give you fantastic results as long as they’re at least an inch thick. Just stick to that target temperature of 145°F (63°C).
Is the pan sauce really necessary?
The pan sauce is optional, but oh-so-worth-it! It takes just a couple of minutes to make and uses those delicious browned bits left in the pan from searing the chops. It adds a wonderful depth of flavor and a lovely glossy finish that really elevates the whole dish. Give it a try, especially if you want to make it feel like a special meal!
How long can I realistically expect this to take on a weeknight?
Honestly, this recipe is designed to be a weeknight hero! If your chops are already out of the fridge, prep and searing take about 10-15 minutes total. The oven time is usually another 10-15 minutes, and the sauce takes just a few minutes while the meat rests. You’re looking at around 30-40 minutes of active cooking time, making it totally doable on a busy evening!
Estimated Nutritional Information
Just a heads up, the nutritional info can really change depending on the exact size of your pork chops and the brands you use. But generally, for one serving of these delicious pork chops with a bit of pan sauce, you’re looking at roughly 350-450 calories, with a good amount of protein (around 35-45g) and moderate fat. Keep in mind these are just estimates to give you a ballpark idea!
Share Your Top Notch Pork Chops Recipes Tender And Juicy Creations
So, how did your top-notch pork chops recipes, tender and juicy, turn out? I’d absolutely *love* to hear all about it! Did you try the pan sauce? Did they come out perfectly moist? Please, drop a comment below and let me know your experience, or even better, share a picture on social media and tag me! You can also reach out anytime through our contact page. Seeing your creations makes my day!

Tender and Juicy Pork Chops
Ingredients
Equipment
Method
- Bring pork chops to room temperature and season. Season both sides of your pork chops with salt and pepper. Set the chops aside on the counter to rest for 30 minutes.
- Preheat your oven to 375°F (190°C) about 15 minutes before you plan to cook the chops.
- Heat a large oven-safe skillet over medium heat for 2 to 3 minutes. Pat the pork chops dry.
- Add the oil to the hot skillet. Carefully place the pork chops into the pan. If the chops have a fatty edge, hold them fat-side-down until the edge browns slightly, about 30 seconds. Sear the chops undisturbed until golden brown on the first side, about 2 to 3 minutes. Flip the chops and cook until the second side is golden brown, another 2 to 3 minutes. Scatter the fresh thyme over the chops after flipping.
- Arrange lemon wedges around the pork chops. Loosely cover the skillet with foil or parchment paper. Transfer the skillet to the preheated oven to finish cooking. If you do not have an oven-safe skillet, transfer the pork chops to a baking dish.
- Bake for 8 to 15 minutes, or until an instant-read thermometer inserted into the thickest part of the chop reads at least 145°F (63°C). Start checking for doneness at 8 minutes and check every 2 minutes thereafter.
- Transfer the cooked pork chops to a plate and loosely cover them with aluminum foil. Let the pork rest for 5 minutes.
- While the pork chops are resting, place the skillet over medium-high heat. Add the chicken stock, brown sugar (or maple syrup or honey), and the juice from the roasted lemon wedges. Use a wooden spoon to scrape the bottom of the pan to loosen any stuck bits.
- Bring the sauce to a simmer and cook until it has reduced by half. Adjust seasoning with salt or more sugar if needed. Remove the skillet from the heat, and when the sauce is no longer simmering, swirl in the butter.
Notes
Tried this recipe?
Let us know how it was!Noah Clark is a skilled Recipe Developer, culinary writer, and food-education enthusiast dedicated to helping home cooks create bold, memorable meals without unnecessary complexity. Known for his clear teaching style, smart technique breakdowns, and modern approach to flavor, Noah has earned the trust of readers who want recipes that are both inspiring and achievable. Today, he proudly contributes to sauvro.com, where he develops reliable, flavor-driven recipes designed for real home kitchens.
Noah’s culinary journey began in independent cafés and farm-to-table restaurants, where he learned the foundations of scratch cooking, seasonal ingredients, and flavor balance. After progressing from prep cook to kitchen lead, he discovered that his true passion was not only cooking—but teaching others how to cook well. Motivated by that mission, he transitioned into culinary content and digital recipe development, combining food knowledge with a talent for communication and instruction.