Ever looked at a perfectly glazed tart or a impossibly smooth mousse and thought, “How do they *do* that?” I used to feel that way too! It’s amazing what you can create in your own kitchen when you learn **how to make dessert recipes like a pro**, transforming simple ingredients into showstoppers. My journey started in a small café kitchen, watching a pastry chef work her magic. It wasn’t about fancy gadgets, but a deep understanding of balance, timing, and just plain *care* for what was on the plate. That’s the real secret – not perfection, but a love for the process and a willingness to learn. Here at Sauvro, we’re all about empowering you with those skills, making gourmet desserts feel totally achievable for your home kitchen. You can learn more about transforming your own kitchen with Sauvro right here.
The Foundation: Mastering Essential Dessert Techniques
Okay, so before we jump into amazing recipes, let’s talk about the *really* important stuff that makes desserts look and taste like they came from a fancy bakery. Learning **how to make dessert recipes like a pro** isn’t about having a secret ingredient; it’s all about nailing down these core techniques. Trust me, once you get these down, everything else just falls into place, and your desserts will have that professional polish you’re aiming for. It’s these fundamentals that really separate a good dessert from a WOW dessert!
Achieving Silky Smooth Textures
You know that super-smooth, melt-in-your-mouth texture you get in a perfect panna cotta or custard? That comes from a few simple things. Always make sure your dairy is warmed gently, never boiled! And when you’re adding ingredients, do it slowly and whisk constantly. It’s all about keeping things happy and combined so you don’t end up with little lumps or a grainy finish. Temperature is your best friend here!
Perfecting Baking and Cooking Times
This is where patience really pays off. Over-baking even the most divine cake or custard is a culinary crime, if you ask me! The key is to know *when* it’s truly done. For cakes, a gentle touch should spring back, and a toothpick should come out with moist crumbs, not wet batter. Custards should just have a slight wobble in the center. Always trust your senses over the clock sometimes; your dessert will tell you when it’s ready!
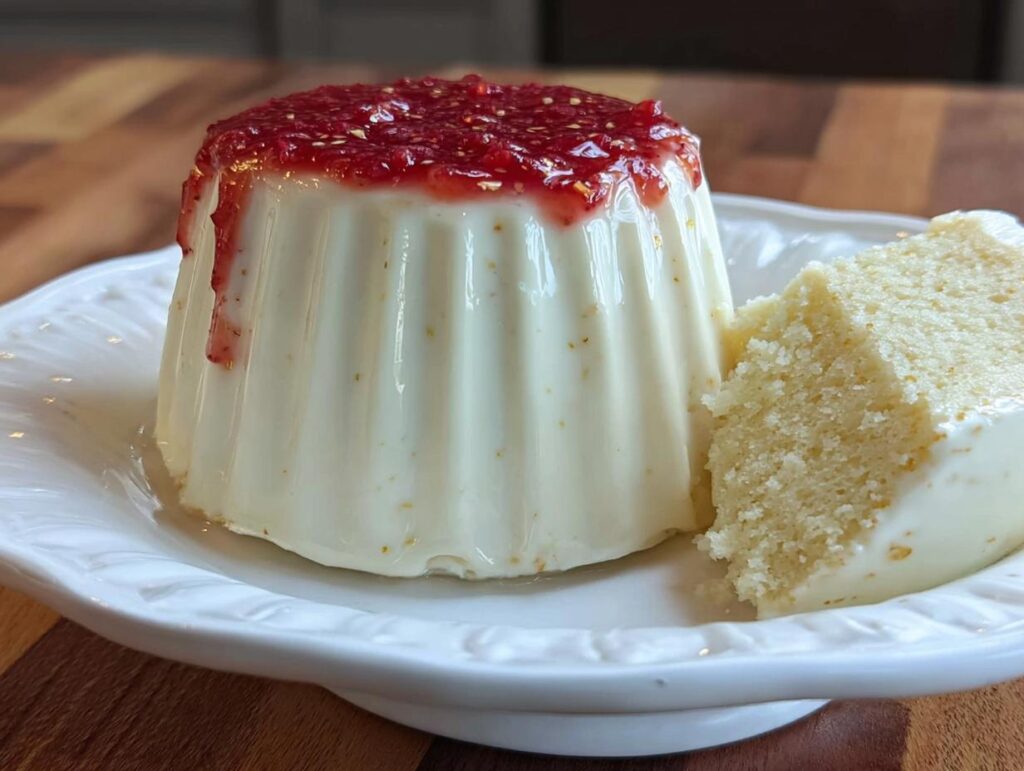
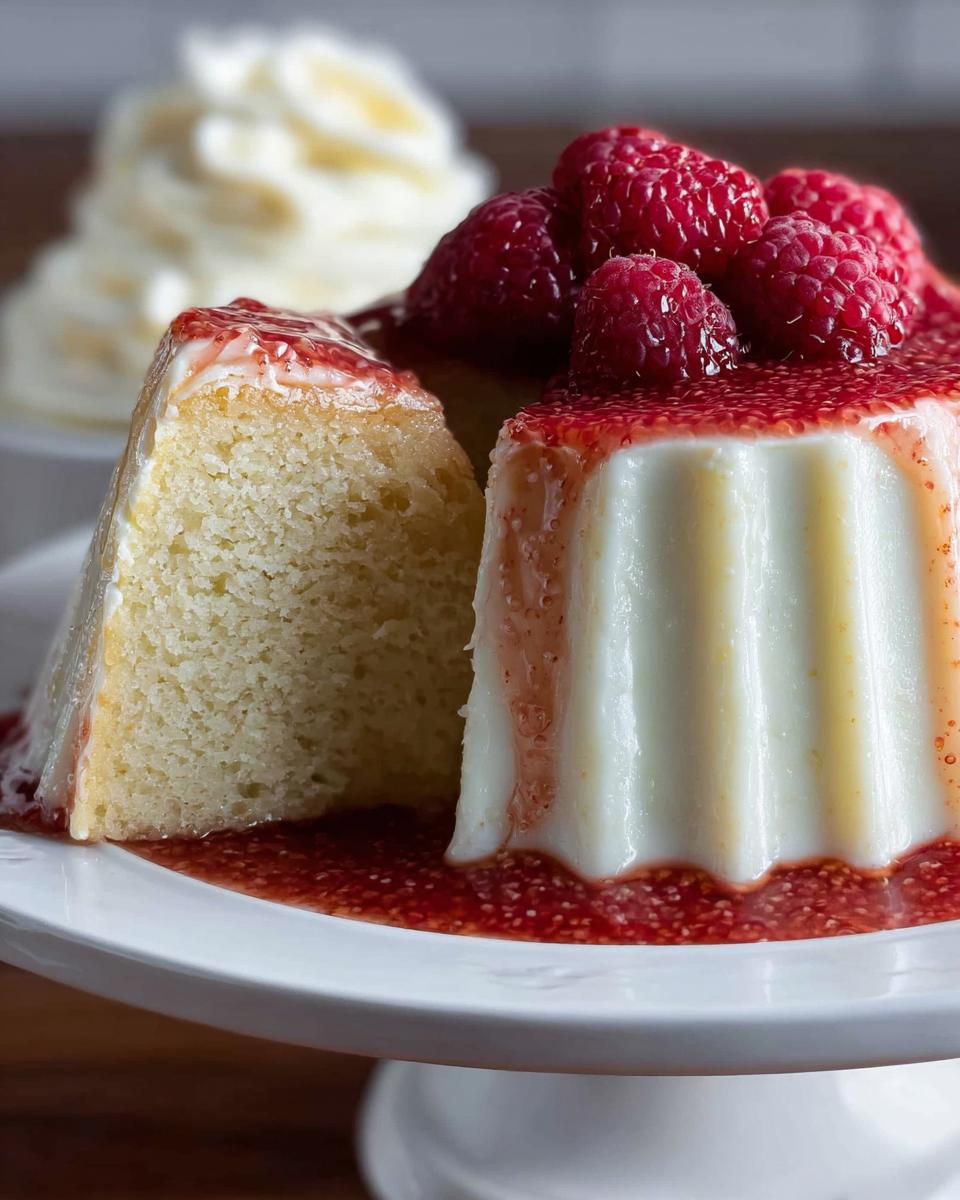
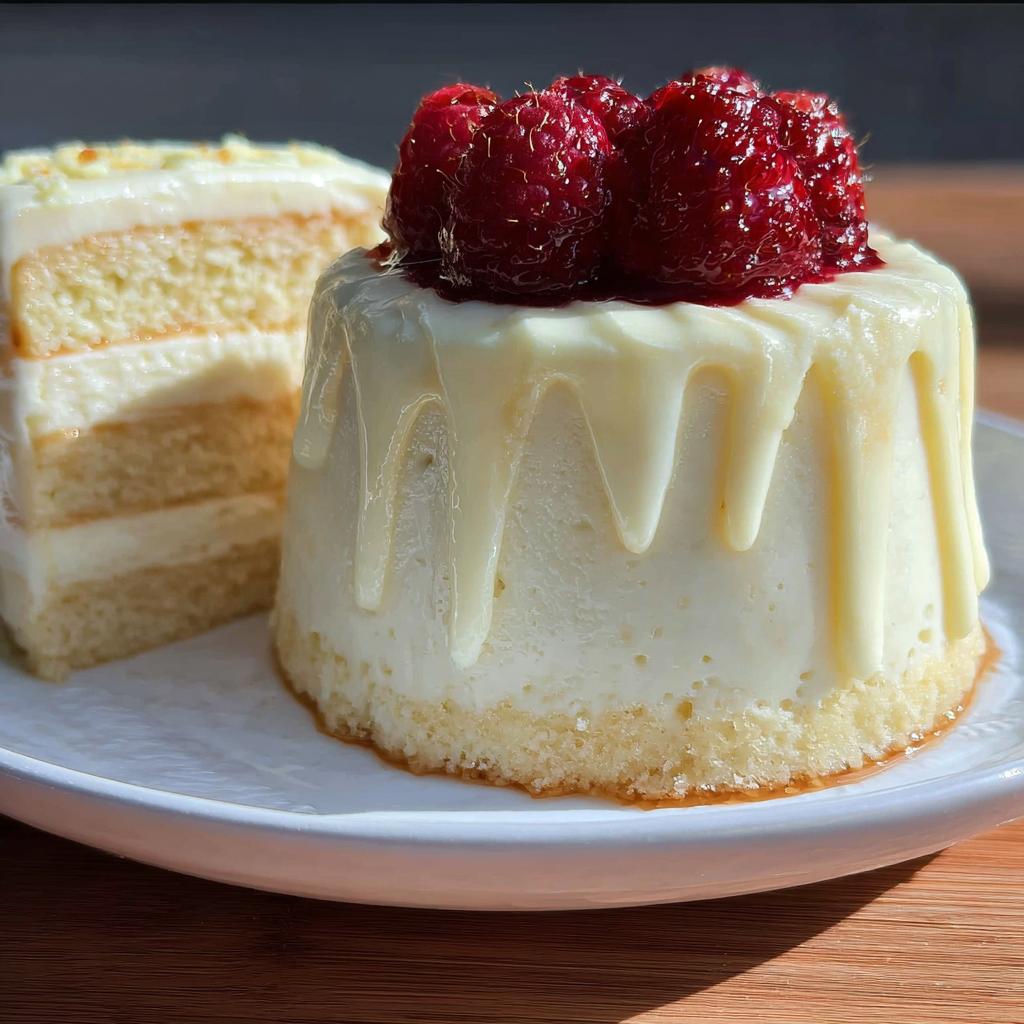
Raspberry Panna Cotta: A Masterclass in Creamy Perfection
Alright, let’s put those skills to the test with something truly elegant but surprisingly simple: Raspberry Panna Cotta! This is where we show you **how to make dessert recipes like a pro** by creating something utterly divine with just a few key ingredients and careful steps. It’s silky smooth, wonderfully creamy, and that bright raspberry topping just sings. This recipe is a fantastic way to see how these professional techniques come together for a dessert that looks and tastes like you spent hours on it, when really, it’s all about understanding the process.
Ingredients for Your Raspberry Panna Cotta
Here’s what you’ll need to make this beautiful dessert:
For the Panna Cotta
- 1/4 oz. unflavored gelatin
- 1 1/4 cups half-and-half, divided
- 1/2 cup granulated sugar
- 1/4 tsp. kosher salt
- 1 3/4 cups heavy cream
- 1 1/2 tsp. vanilla bean paste
For the Raspberry Topping
- 1 cup seedless raspberry jam
- 3 Tbsp. water
- 2 Tbsp. orange liqueur or fresh orange juice
For Serving
- 1 cup fresh raspberries, to serve
Step-by-Step Guide: How To Make Dessert Recipes Like A Pro with Panna Cotta
Ready to make some magic? Follow these steps closely:
First things first, grab a small bowl and sprinkle your gelatin over ¼ cup of that half-and-half. Let it sit for about 10 minutes; this is crucial for dissolving it smoothly later. Don’t rush this step!
Now, in a medium saucepan, combine the rest of the half-and-half (that’s the remaining 1 cup), your sugar, and the salt. Whisk it all over medium-low heat. You just want it to get nice and steamy, not boiling. Once it’s steaming, add your bloomed gelatin. Keep whisking gently until everything is dissolved and you have a smooth mixture. Again, no boiling here – we want to keep that silky texture.
Take the saucepan off the heat. Give it a good whisk with the heavy cream and that lovely vanilla bean paste. This is essentially your panna cotta base now!
Get a baking sheet ready and place your 6 (6-oz.) ramekins on it. Carefully divide the cream mixture among these ramekins. A ladle or spoon works perfectly here to make sure you get a good amount of that vanilla bean paste in each one. Cover the baking sheet with a big sheet of plastic wrap, making sure you don’t let the plastic touch the cream mixture itself.
Now for the patience part: pop it into the fridge for at least 6 hours, or better yet, overnight. This is what sets it all up beautifully. While it’s chilling, let’s make the topping. In a microwave-safe bowl or a glass measuring cup, combine the raspberry jam, 3 tablespoons of water, and your orange liqueur or juice. Pop it in the microwave for short bursts of 10 seconds, stirring in between, until it’s smooth and lovely. Let this cool down before you plan to serve.
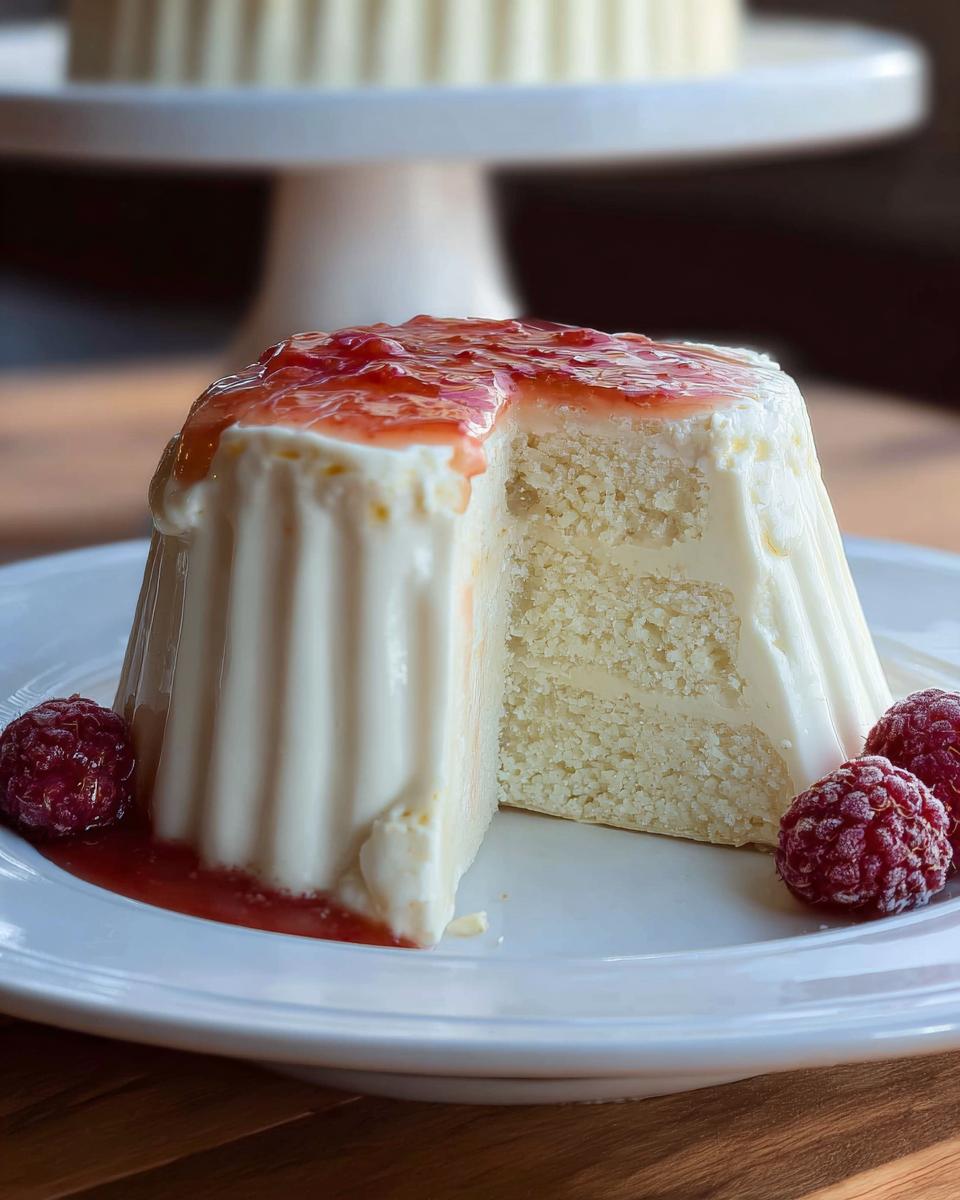
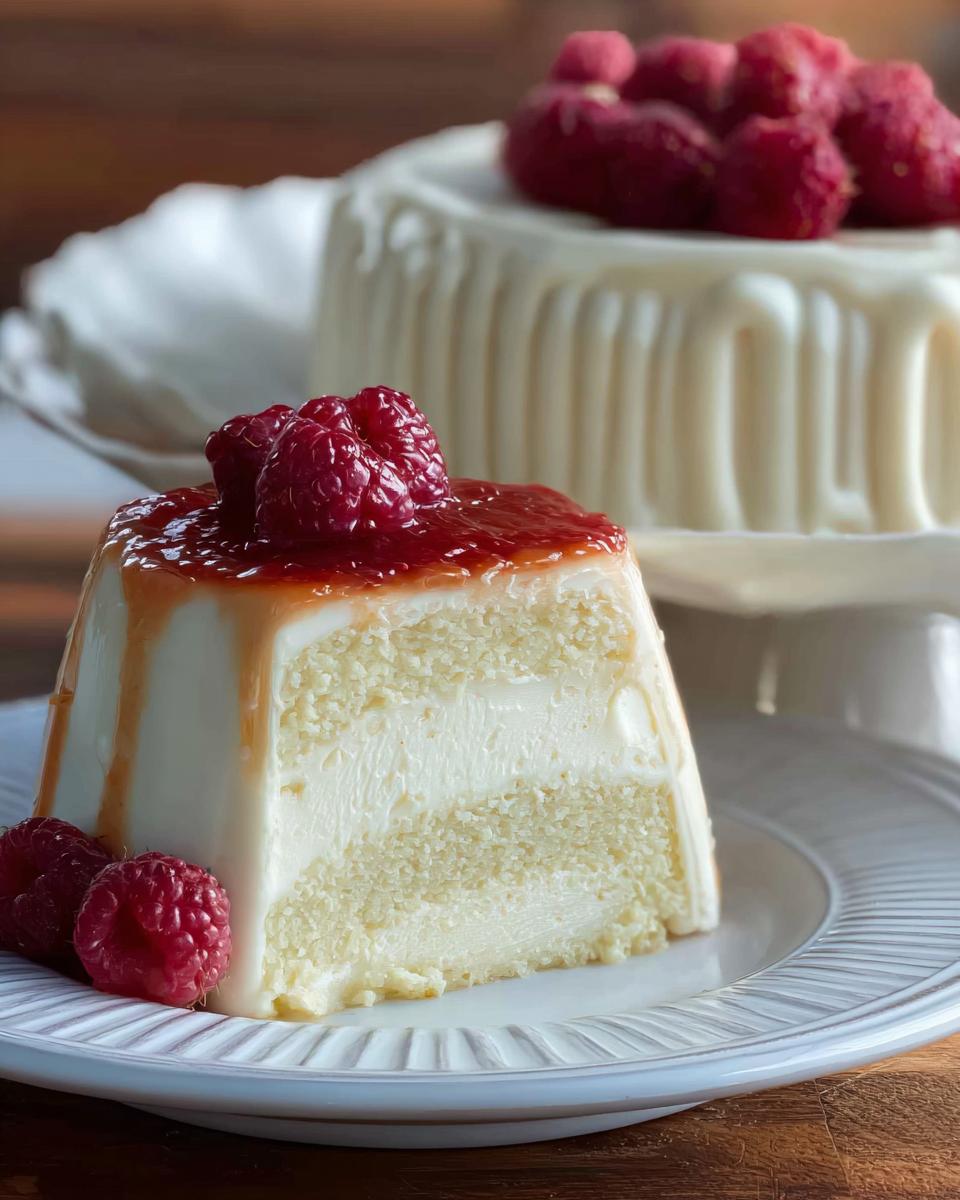
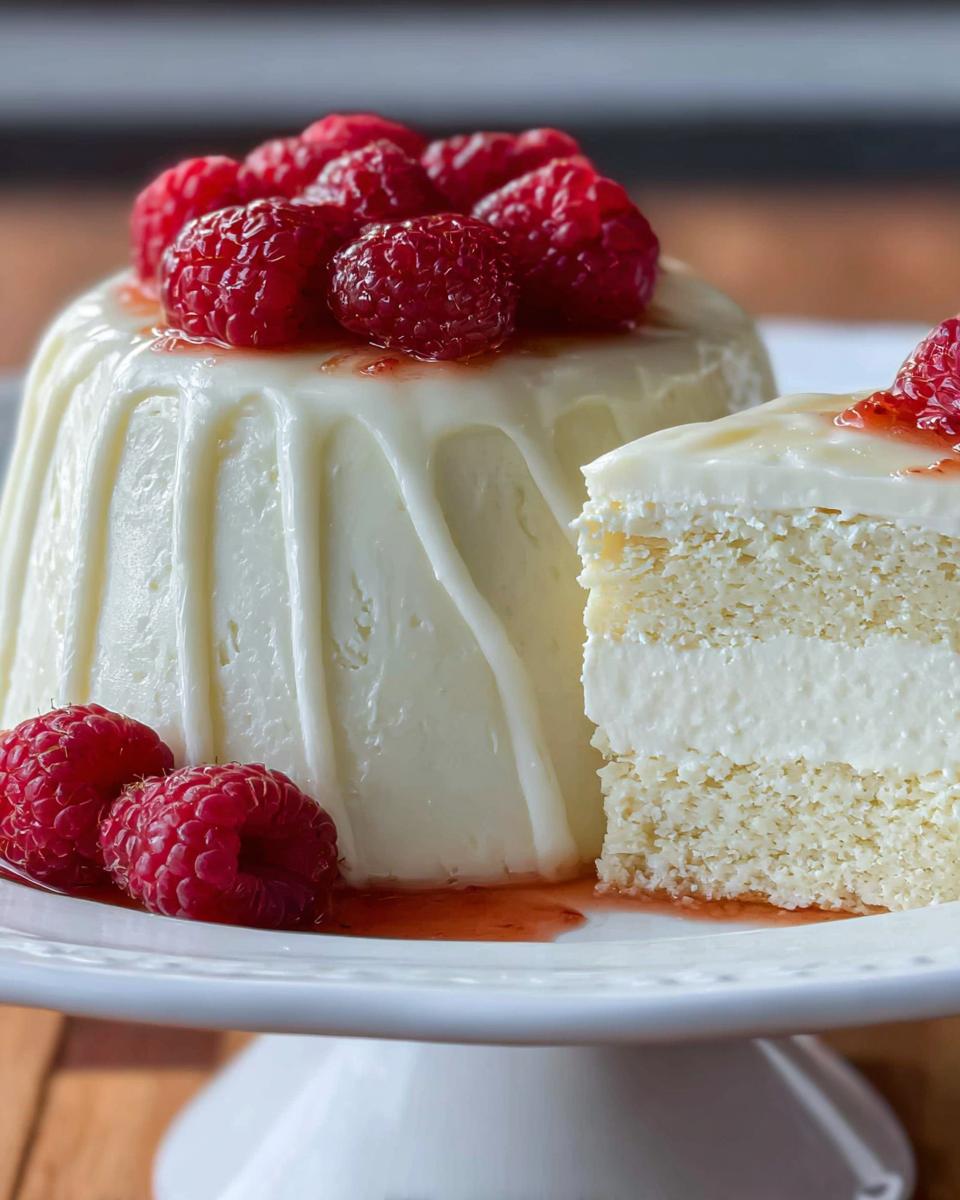
When you’re ready to serve, you’ll want to unmold them. Fill a shallow dish with hot water. Take your knife and gently run it around the top edge of the panna cotta in the ramekin – just enough to loosen it, don’t cut into that beautiful custard! Then, carefully dip the ramekin, up to its rim, into the hot water for about 3 seconds. Quickly invert it onto your serving plate. You should hear a little sigh as it comes out!
Finally, spoon that gorgeous raspberry mixture over the top of each unmolded panna cotta. Garnish with a few fresh raspberries, and there you have it – a dessert that screams ‘professional’! Serve it right away and enjoy the fruits (literally!) of your labor.
Tips for Perfect Panna Cotta Presentation
Getting that panna cotta out of the ramekin can feel a little nerve-wracking the first time, but the hot water dip trick is your best friend! Just a quick dip, no more than 3 seconds, is usually all it takes. If it doesn’t release easily, give it another *very* quick dunk. When you plate it, don’t be afraid to let that raspberry coulis pool slightly around the base – it looks so tempting! A few fresh berries on top add a pop of color and freshness. It’s those little details that make a big difference.
Beyond the Recipe: Elevating Your Dessert Creations
So, you’ve mastered the panna cotta! That’s awesome! But the cool thing is, all these tricks apply to SO many other desserts, making you feel like a total pro. It’s not just about following a recipe anymore; it’s about understanding *why* things work. This is where you start truly elevating your home baking game and making those desserts sing! You can learn more about taking your cooking overall to the next level with us over at Sauvro.
Flavor Pairings and Ingredient Quality
Think about how flavors play together. A sharp citrus zest can cut through a rich chocolate cake, or a hint of spice can make fruit desserts pop. Don’t be afraid to play around! And honestly, using good quality ingredients makes a massive difference. Fresh, ripe fruit, real vanilla, good chocolate – they all add up to a more luxurious taste that you just can’t fake.
The Art of Dessert Presentation
Presentation is basically the ‘wow’ factor, right? Beyond just unmolding perfectly, think about adding a contrasting drizzle, a sprinkle of toasted nuts, or a perfectly placed fresh berry. Even how you dust with powdered sugar makes a difference! It’s about creating something beautiful for the eyes as well as the taste buds. Your dessert should look as good as it tastes!
Frequently Asked Questions About Dessert Making
Got burning questions about making your desserts next-level? I’ve got you covered! Let’s dive into some common things folks wonder about when they’re trying to cook like a pro!
Can I make panna cotta ahead of time?
Oh, absolutely! That’s one of the best parts about panna cotta. It actually needs that time in the fridge to set properly. Making it the day before is perfect for parties or when you just want a stress-free dessert ready to go.
What are some common mistakes when learning How To Make Dessert Recipes Like A Pro?
A big one is not tasting as you go! Just a little taste can tell you if it needs more sweetness or spice. And sometimes, people get afraid to unmold their desserts, but trust me, a little confidence and the right technique usually works wonders!
How can I substitute ingredients in professional dessert recipes?
When you’re aiming for pro results, it’s best to stick close to the recipe, especially with baking. But if you *have* to swap, think about similar flavor profiles and functions. For instance, a different berry jam might work for the topping, or a different citrus zest, but be very careful changing fats or flours, as they deeply affect texture.
Why You’ll Love Making Desserts Like A Pro
Seriously, when you start making desserts that look and taste like they came from a fancy patisserie, it’s a game-changer! Learning **how to make dessert recipes like a pro** isn’t just about impressing your friends (though that’s super fun!). It’s about the confidence you build, the joy of creating something beautiful, and the pure delight on people’s faces when they take that first bite. Plus, mastering these skills opens up a whole new world of flavor and creativity in your kitchen. Ready to feel like a dessert wizard? You can discover more ways to bring that pro touch to your cooking with our tips at Sauvro.
- You’ll feel a huge sense of accomplishment!
- Your friends and family will be seriously impressed (and who doesn’t love that?).
- You’ll discover a new level of creativity in your kitchen.
- You’ll gain the confidence to tackle any dessert recipe.
- You’ll simply find more joy in the whole baking process.
Storage and Reheating Tips for Your Desserts
So you’ve made this gorgeous Raspberry Panna Cotta, perhaps even a whole batch of ’em! That’s fantastic. Now, how do you keep that creamy goodness perfect? For the panna cotta itself, the best way to store it is right in those cute ramekins, covered tightly with plastic wrap. Pop them back in the fridge, and they should stay wonderfully creamy for about 2-3 days. Just make sure that plastic wrap really seals it to prevent any fridge odors from creeping in! As for reheating, you don’t really need to. Panna cotta is best served chilled. If your topping got a little stiff after sitting out, just give it a quick stir before spooning it over. Easy peasy!
Share Your Professional Dessert Creations
Okay, now it’s your turn to shine! I absolutely *love* seeing what you all create in your kitchens. So, if you whip up this Raspberry Panna Cotta or try out some of these pro techniques on another dessert, I’d be thrilled if you’d share your masterpieces. Leave a comment below, give the recipe a star rating if you enjoyed it, or tag us on social media! It really makes my day to see your beautiful desserts. You can also reach out with any questions or just to say hi here!
Raspberry Panna Cotta
Ingredients
Equipment
Method
- In a small bowl, sprinkle the gelatin over ¼ cup of the half-and-half. Allow the gelatin to soften for 10 minutes.
- In a medium saucepan, combine the remaining 1 cup of half-and-half, sugar, and salt. Whisk the mixture over medium-low heat until steaming. Add the gelatin and continue to whisk, careful not to boil the mixture, until the gelatin and sugar are dissolved.
- Remove the mixture from the heat and whisk in the heavy cream and vanilla bean paste.
- Place 6 (6-oz.) ramekins on a baking sheet. Divide the cream mixture among the ramekins, using a ladle or spoon so that the vanilla bean paste is evenly distributed. Place a large sheet of plastic wrap over the baking sheet, careful not to let the plastic touch the cream.
- Refrigerate for 6 hours or overnight.
- In a medium microwave-safe bowl or glass measuring cup, combine the raspberry jam, 3 tablespoons of water, and orange liqueur or orange juice. Microwave in 10-second increments until smooth and well combined. Allow to cool before using.
- Fill a dish with hot water. Using a small knife, loosen the top edges of the panna cotta from the ramekin, careful not to cut into the custard. Dip the ramekin up to its rim into the bowl of water for about 3 seconds. Invert onto a serving plate.
- To serve: Spoon the raspberry mixture over each serving of panna cotta. Top with fresh raspberries. Serve immediately.
Notes
Tried this recipe?
Let us know how it was!Blake Morgan is a seasoned culinary writer dedicated to helping everyday cooks create dishes that are bold, approachable, and deeply satisfying. With a reputation for developing recipes that are both practical and inspiring, Blake has become a trusted voice for readers who want meals that excite the palate while still fitting into real-life routines. Today, Blake proudly shares this passion and expertise as a core contributor to sauvro.com, a platform committed to elevating the home-cooking experience.
Blake’s culinary journey began in local restaurants and community food programs, where early hands-on experience shaped a strong foundation in cooking fundamentals, ingredient pairing, and kitchen efficiency. After progressing from line cook to recipe consultant, Blake discovered a natural talent for teaching and communicating technique—leading to a career shift into food media and digital recipe development. This transition unlocked an even wider audience, allowing Blake to merge educational storytelling with flavorful recipe creation.